
When you are just getting started in photography, your main goal in editing your shots is the result of your work and the final look of the shot, not the process itself. Unfortunately, this is the mistake most photographers make. Why is it a mistake? Because the skill of using some software, such as Adobe Photoshop or Luminar Neo, can make your work much easier and faster, and the result will be of much higher quality than you could imagine.
One of the tools that will help you organize your work process and take you to the next level is, of course, the masking layer. Skylum’s Luminar Neo has a handy tool that lets you easily create a layer mask. Knowing how to work with this tool will give you the opportunity to edit photos, without changing the frame itself, in a non-destructive way. It is a very handy method of working.
What is Layer Mask?
It is a way to correct an image without making changes to it by using a layer. This method is very useful, for example, in the following cases:
- If you have a need to remove or change part of the background of a photo, such as removing the trash or adding any objects;
- Spot-correcting, for example, if you have imperfections on the subject’s face. In this case, you remove such flaws by using a layer and not by editing the original frame. Such actions can be realized by using the “Eraser” tool, but in that case, you edit the photo directly, and you won’t be able to return to the original version at some stage of the work, given Adobe Photoshop’s “short” memory.
Let’s see what’s useful about this way of working.
One of The Biggest Advantages is Non-Destructiveness
As mentioned above, using layers you make changes that you can at any time return, and have the opportunity to make a mistake, which you can easily correct. The image remains original, while the “Eraser” destroys part of the image irretrievably.
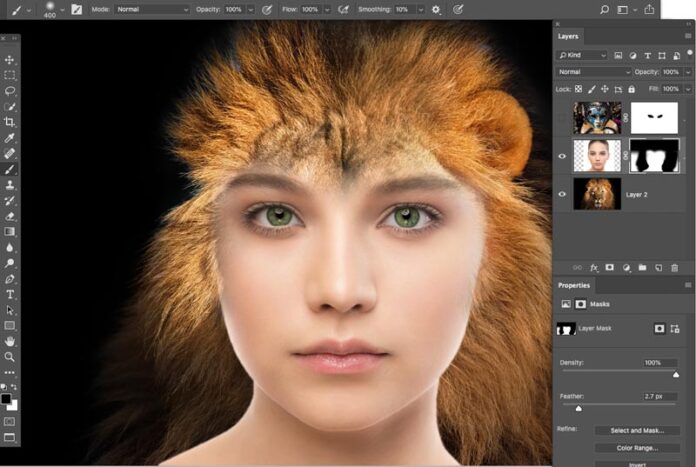
In order to learn how to work with layer masks, you need to understand how the white and black masks work, which helps hide the parts of the photo that do not need to be corrected and make changes on the desired part.
Spot Refinement of the Cutout Object
Let’s take this point as an example. Imagine a situation where you are painstakingly editing a portrait of your subject. Already approaching the finale, you suddenly notice that, when changing the background, you accidentally cut off part of the subject’s ear. The mistake is disastrous, and you realize the following – since this part of the head has been removed, and the action was done many steps ago, you can not go back to this stage of the work, and everything must start from the beginning.
That’s why you should use layer masks and in such a situation act in the following way, namely:
- highlight the area you want to return to;
- paint over the mask with white, and then the photo fragment becomes visible again.
An incredibly useful feature to use in Adobe Photoshop.
Elementary Copying Helps To Save Time
In order to duplicate the masks in relation to the layers you want there is no need to do the original steps for each individual layer. Just drag the mask with the parameters you specified above to another one and hold Alt. That’s it, the copying is done.
Apply Ready-made Masks to Several Layers At Once
Another exciting feature of Adobe Photoshop is the ability to effectively change a whole group of layers at once. To do this, you need to group layers and apply a single mask to them. Everything is elementary. It saves you time editing each layer separately.
Gradient as An Edge-Softening Tool
When you combine several layers of different sizes, you have to get rid of part of the layer that is larger. You can erase it irretrievably, or you can temporarily remove it with an option to return it later.
You can also apply the gradient tool to soften the edges and make the edges smooth if necessary. After combining the layers, choose the tool, and choose a transparent gradient. Then we apply the black color to the foreground and move the mouse over the desired edge. You get the hidden transition.
How to Use The Tool In Practice

After reading the text above, you’ve seen how awesome this tool is, but how to use a layer mask in Photoshop?
To create a layer mask you have to do the following steps:
- after selecting the layer you want, you click on the mask symbol in the Layers panel;
- a white frame appears automatically, on which you can see everything;
- then you need to either leave the background or change it to black, depending on what you want to do.
With a few more taps on the layer panel, you keep your work intact.
Final Thoughts
Now you understand exactly what the tool is, what it does, and how to use a layer mask. You might think it’s a complicated process that requires a lot of work, but in fact, once you start applying it you’ll see how convenient it is and you’ll use it all the time! The process becomes simple, and productive, and guarantees excellent results without losing the original look of the photo at any stage of editing. Definitely one of the best Adobe Photoshop tools.


