
All Mac users run into the “Disk almost full” message eventually. With all photos, videos, and documents stored on our devices, no matter how much disk space the Mac comes with, it will go overboard at some point. Then, the message will appear, nudging you to take some steps to regain some open space.
In this post, we’ve put together a comprehensive solution to the running out of disk space woes.
What does “Disk Almost Full” mean?
The disk is an indispensable part of your Mac, given that it’s the stronghold for your operating system and all your files and applications. The message “Disk Almost Full” can make your Mac stop in its tracks because it lacks open space to function properly. You may wonder how much free space is optimal for a Mac to maintain. The answer is between 15%-20% of free disk space. Anything lower than that number may cause your Mac to crash or lose its speed.
Now that we’ve defined the problem let’s see how you can solve it. As your first step, you may want to check how close your disk space is to the red flag of 15% free space and less. You can check your disk space status by going to the menu bar and clicking on the Apple menu, and then About This Mac. In this section, you’ll access the big picture of how your Mac’s memory is distributed across Apps, Photos, Documents, etc.
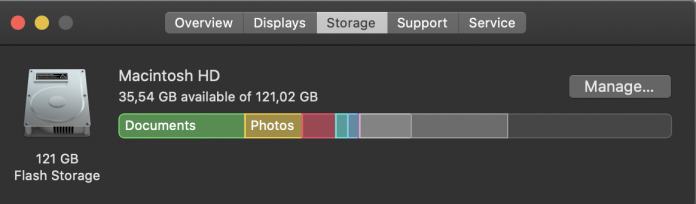
It will also give you an idea of which type of files prevails in your Mac so that you can dive deeper into them and delete the unneeded ones of a particular type. We bet your movies and photos are among the biggest space hoggers. You can find those files manually and remove them to free up some space instantly.
Take out the Trash Bin
Many Mac users tend to think of the Bin as a place to store files in the hopes of using them again. As obvious as it sounds, erasing items in your Bin will free up space on your disk, especially if it’s been weeks or even months since you’ve visited this folder. To remove the files in the Bin, right-click on its icon on your Dock and pick Empty Bin. You can also do it from the Bin itself, where you should click the Empty button.
Dive into the Downloads Folder
Most programs and browsers save files in the Downloads folder unless you’ve set it up differently. Chances are your Downloads folder contains files downloaded years ago. The Downloads folder of an average user is a mess, keeping all manners of files. The only way to clean your Mac is to dive into the Downloads folder and wade through the files one by one and decide if you want to keep or remove them. The sorting option in Finder will come in handy as you manage your files.
Clear the Cache
The cache stores temporary files generated by your operating system, browser, and other software. These files are meant to make your Mac experience more speedy, but the downside is that they can take up a lot of space on your disk, especially if they go back to your old applications. As such, it’s a good idea to purge your temporary files once in a while. Here’s how you can do it:
- Launch Finder – Go – Go to Folder;
- Type in ~ / Library / Caches;
- Press Enter.
That will open your temporary storage that looks like a collection of files. Your task here is to look into each folder one by one and delete its files without deleting the folder itself.
Next, you should clear the browser cache. The steps vary from browser to browser. Below, we’ve described the steps for the two most popular browsers:
Steps for Safari users:
- Launch Safari and go to Preferences;
- Switch to the Add-ons tab;
- Go to the Developer menu in the menu bar;
- Click Clear Caches.
Steps for Chrome users:
- Launch Google Chrome and go to Settings;
- Open History – Clear History;
- Select Cached Images and Files checkbox;
- Pick the period you want to go with;
- Finalize by confirming the actions.
Delete unused apps
Your Mac may harbor dozens of apps, most of which you forgot existed. Deleting rarely used apps is a proven way to win back a big chunk of disk space. It’s pretty straightforward how you should go about it.
- Find an app in the Finder or via Launchpad;
- Drag and drop it into the Bin or select Move to Bin from its menu;
- Erase the Bin to uninstall the apps completely.
It’s also vital to clear the cache after removing a bunch of apps, given that your Mac may still keep their temporary files from deleted apps. To do that, follow the steps we’ve described in the previous section.
Transfer data to external storage
An abundance of heavy files can bog down your Mac. With this in mind, consider paying a visit to your Movies, Music and Photos folders, which usually contain the most sizable files within the system. An alternative way to locate hefty files is via Finder:
- Launch Finder;
- Go to File in the menu bar;
- Pick the section New Smart Folder;
- Then, open the folder from the menu bar;
- Click on the Plus and set up the file size parameters.
By going through these steps, you’ll find the largest files stored on your Mac. It’s up to you whether to purge them altogether or move them to the Cloud or an external hard drive. Either way is good for saving space on your Mac.
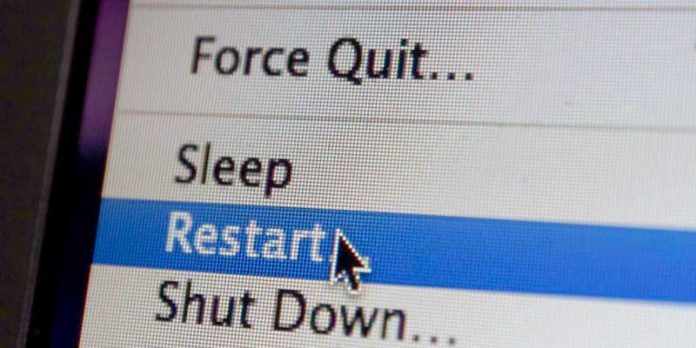
Finally, restart your Mac
We’ve described the baseline steps you can take to free up disk space. If those have helped remedy the problem – great! If your Mac still begs for more disk space, here are some extra steps that can help you.
After spring cleaning your Mac, it’s best to give it a fresh start. So, reboot the system after you’ve cleared the disk space to let the changes settle. It may also help you remove cached files and end rogue processes that can be too heavy on your Mac’s storage. Good luck!


